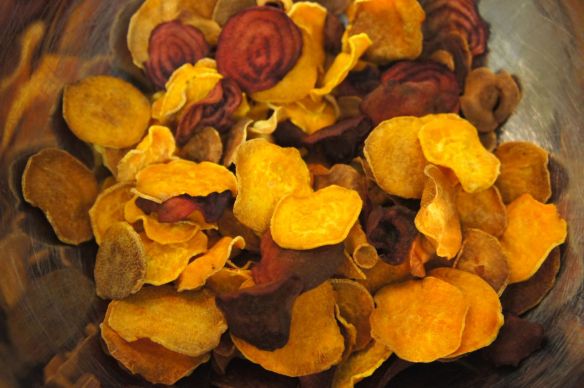
 Since I came to the UK, I have all too often indulged in Tyrell’s veg crisps, made with beetroot, parsnips, and carrot. They are delicious – but they’re also very greasy, salty, and made with sunflower oil, which isn’t a very healthy oil. After some trial and error, I have come up with an alternative that’s even more delicious. My oven-baked root vegetable crisps are crunchy, satisfying, and because they’re a lot less greasy and salty, the real taste of the root vegetable shines through. And lest you think this means they’re yucky, let me tell you: my junk food-loving small children adore these.
(An aside because I’m a word nerd: though I’m Canadian, I’ve come to prefer the term “crisps” especially for these babies because, well, they’re crispy – and besides, “chip” is ambiguous. Fries? Wood? Bingo? Attitude problem? Guy with an old-fashioned nickname?)
I could eat these every day without guilt. They’re gluten-free, dairy-free, low to moderate-FODMAP (sweet potatoes are moderate in FODMAPs), grain-free and paleo. However, I don’t eat them every day because – let me be honest – making them is a somewhat time-consuming endeavour. The following two pictures should explain why. They depict the exact same vegetables on the exact same baking sheet. They were shot from roughly the same distance and angle.

Before

After
Yes. That is a lot of shrinkage. It does take quite a bit of time to lay out thin slices of root vegetables onto baking sheets one by one, bake them, flip them over one by one (not always necessary), bake them some more, then remove them only to get a disappointingly small bowl. However, because much of the time isn’t hands-on time, it is quite feasible to get other things done as you’re making these.
A word of warning, though: although I haven’t tried it myself I would caution against using a dehydrator rather than an oven. I’ve read that attempts at dehydrated vegetable crisps are unpleasant. I can only imagine. Sorry, raw foodists, but these crisps aren’t meant to be raw. There is a world of difference between a baked crispy slice of sweet potato and a raw dehydrated one.
As for which vegetables to use, sweet potato and beetroot (beets) turn out most beautifully, but I always use parsnips too because they taste fantastic in this format. I’ve often used carrots as well and they too are delicious but they’re a bit more finicky – they’re usually smaller in diameter, which results in a very small crisp indeed, and because they tend to curl oddly (they turn into a sort of ruffled bowl, as do parsnips – however, it’s easier to get very wide parsnips) it’s harder to get them evenly dehydrated.
I’ve yet to try swede (rutabaga) but I mean to one of these days. I’d be willing to bet a similar method could be used with plantain but alas, plantain is hard to come by where I live.
If you use beetroot and don’t want all your root veg crisps to turn out red, do them separately. Otherwise it’s OK to mix vegetables on one baking sheet.

Beetroot slices before baking
I recommend olive oil to bake these with. I often cook with olive oil. I know a lot of people say you shouldn’t. But that myth doesn’t seem to be borne up by science. (See articles here, here, here and here.) Besides, it imparts a pleasant taste and aroma that can’t be matched.
One final note before the recipe: I don’t specify quantities because you can make as much or as little as you like. There’s nothing to measure here; all that matters is how much you want to make and how much time you’re willing to spend making it at once. These crisps keep well in a resealable plastic bag. I once managed to make a large bag last a few weeks on the shelf. It might have lasted a lot longer but I was hungry and they were way too yummy.
Oven-baked root vegetable crisps (chips)
- Root vegetables (sweet potato, beetroot, parsnip, carrot) – use the widest vegetables you can, or at least the widest you can fit into your food processor)
- Olive oil
- Sea salt
- Preheat oven to 125 C/250 F and arrange racks so one is near the bottom of the oven and one is near the middle.
- Peel vegetables (may not be necessary for carrot) and slice very thinly (but not quite paper-thin) using a mandoline or the mandoline attachment on your food processor. I suppose you could slice by hand but it would take a long time and unless you’ve got Iron Chef-like knife skills you’ll probably end up with some slices that are too thin and some that are too thick.
- Put the sliced vegetables in a bowl (use a separate bowl for beets) and drizzle generously with olive oil and shake on sea salt to taste. Mix well.

- Line baking sheets with non-stick baking parchment. Put sliced vegetables one by one on the baking sheets, avoiding overlapping.
- But baking sheets in the oven and bake until the top sheet of vegetables is starting to look crisp but not burnt. Since you are baking at a fairly low temperature, you are unlikely to burn the vegetables if you’re watching closely enough but it’s certainly not impossible. You don’t want to go too low in temperature because you’ll end up with raw dehydrated root vegetables, which I understand don’t taste very nice.
- Assuming you’re using two baking sheets at a time, take out the one that was on top and put the bottom sheet on the higher rack.
- Inspect the vegetables from the higher baking sheet. While they’re still warm, gently try to bend them without breaking them. If they’re still pliable in the middle, they’re not ready. Turn them over. If they feel like they’d break if you tried harder to bend them, they’re ready. Put them in a bowl at room temperature. They will firm up somewhat as they cool but they won’t firm up that much – any vegetables that are still pliable will end up tasting leathery instead of crispy. You don’t want that.
- Put the ones that had to be turned over in one section of the baking sheet and, if you’re still making more, put more raw vegetables on the rest of the now-clear baking sheet. Put back in the oven.
- Lather, rinse, repeat. Keep a close eye on what you’ve got in the oven to avoid burning. Keep going until you’ve used up all your vegetables.
- Store cooled root vegetable crisps in an airtight container or resealable plastic bag.


You’re right! the commercial ones *are* way too oily. I’m going to try some root veg crisps in my dehydrator. 😀
LikeLike